With DHTMLX Scheduler .NET you can create not solely a MVC-based calendar control but also get a ready simple ASP.NET calendar application/scheduling solution (WebForms): 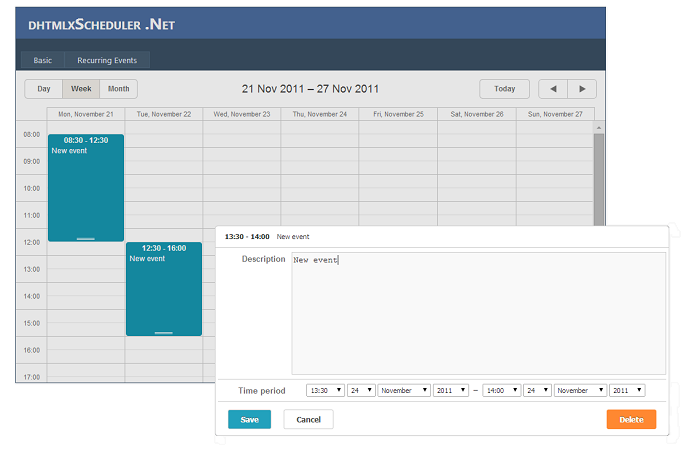
Simply follow the 11 steps described below to get a simple ASP.NET calendar:
1. Create a new C# project by selecting ASP.NET Web Application;
2. Copy the library reference to your ‘App_Data’ project folder and go to References -> Add the reference to your application;
3. Copy the provided calendar scripts to the Scripts folder of your project;
4. Create a new database by right-clicking on ‘App_Data’ -> Add New Item -> Select SQL Sever Database and name it “Sample.mdf”;
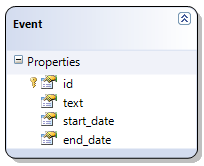
5. Add a new table with the columns id, text, start_date and end_date. Data types should be set as int, nvarchar(250), datetime and datetime correspondingly (see the picture below). Save it as “Event”. Note that a primary key should be assigned to id and the identity column has to be additionally enabled;
The table can also be created with the following query:
CREATE TABLE [dbo].[Events](
  [id] int IDENTITY(1,1) NOT NULL,
  [text] nvarchar(250) NULL,
  [start_date] datetime NOT NULL,
  [end_date] datetime NOT NULL,
  PRIMARY KEY (id)
)
6. Right-click on ‘Your_project_name’ to create a new LINQ to SQL database model, name it “Sample.dbml” and add “Event” table to it;
7. To create the Scheduler object, go to “Default.aspx.cs” and configure your event calendar using a ‘Page_Load’ method (‘Page_Load’ is generated automatically when “Default.aspx” is created). To render the Scheduler from CodeBehind to the web-page, add a property to save data and assign the Scheduler object to the mentioned property:
using System;
using System.Collections.Generic;
using System.Linq;
using System.Web;
using System.Web.UI;
using System.Web.UI.WebControls;

using DHTMLX.Scheduler;

namespace mySchedulerNET
{
	public partial class _Default : System.Web.UI.Page
	{
		public DHXScheduler Scheduler { get; set; }
		protected void Page_Load(object sender, EventArgs e)
		{
			this.Scheduler = new DHXScheduler();
		}
	}
}
Set the initial date and the recurrence pattern for your calendar events:
Scheduler.InitialDate = new DateTime(2011, 11, 24);
Scheduler.Config.first_hour = 8;
Scheduler.Config.last_hour = 19;
Scheduler.Config.time_step = 30;
Scheduler.Config.limit_time_select = true;
Define a route to load and save data:
Scheduler.DataAction = "Data.ashx";
Scheduler.SaveAction = "Save.ashx";
Enable data loading and processing, prevent cache:
Scheduler.LoadData = true;
Scheduler.EnableDataprocessor = true;
The full code will look like this:
using System;
using System.Collections.Generic;
using System.Linq;
using System.Web;
using System.Web.UI;
using System.Web.UI.WebControls;

using DHTMLX.Scheduler;


namespace mySchedulerNET
{
    public partial class _Default : System.Web.UI.Page
    {

        public DHXScheduler Scheduler { get; set; }
        protected void Page_Load(object sender, EventArgs e)
        {
            this.Scheduler = new DHXScheduler();

            Scheduler.InitialDate = new DateTime(2011, 11, 24);


            Scheduler.Config.first_hour = 8;
            Scheduler.Config.last_hour = 19;
            Scheduler.Config.time_step = 30;
            Scheduler.Config.limit_time_select = true;

            Scheduler.DataAction = "Data.ashx";
            Scheduler.SaveAction = "Save.ashx";
            Scheduler.LoadData = true;
            Scheduler.EnableDataprocessor = true;

        }
    }

}
8. Create “Default.aspx” to render your event calendar and set the initial size of the calendar container:
<%@ Page Title="Home Page" Language="C#" MasterPageFile="~/Site.master" AutoEventWireup="true"
    CodeBehind="Default.aspx.cs" Inherits="mySchedulerNET._Default" %>

<asp:Content ID="HeaderContent" runat="server" ContentPlaceHolderID="HeadContent">
</asp:Content>
<asp:Content ID="BodyContent" runat="server" ContentPlaceHolderID="MainContent">
    <div style="height:509px; width: 100%;">
        <%= this.Scheduler.Render()%>
 </div>
Override the default styles of the web-site. Set “0” padding to let the scheduler occupy the entire area of the application container:
      <style>
             .main
              {
                     padding: 0 !important;
                     margin:  0 !important;
              }
      </style>
</asp:Content>
The full code will look as follows:
<%@ Page Title="Home Page" Language="C#" MasterPageFile="~/Site.master" AutoEventWireup="true"
    CodeBehind="Default.aspx.cs" Inherits="mySchedulerNET._Default" %>

<asp:Content ID="HeaderContent" runat="server" ContentPlaceHolderID="HeadContent">
</asp:Content>
<asp:Content ID="BodyContent" runat="server" ContentPlaceHolderID="MainContent">
  <div style="height:600px; width: 100%;">
      <%= this.Scheduler.Render()%>
  </div>
  <style>
      .main
      {
              padding: 0 !important;
              margin:  0 !important;
      }
  </style>
</asp:Content>
9. Right-click on “Your_project_name”, add a Generic Handler and name it “Data.ashx”. Connect the required namespaces where Scheduler is defined and change the content type to ‘json’ for data rendering:
using System;
using System.Collections.Generic;
using System.Linq;
using System.Web;
using DHTMLX.Scheduler.Data;

namespace mySchedulerNET
{
    public class Data : IHttpHandler
    {
        public void ProcessRequest(HttpContext context)
        {
            context.Response.ContentType = "text/json";
            context.Response.Write(
                new SchedulerAjaxData(new SampleDataContext().Events).ToString()
            );
        }

        public bool IsReusable
        {
            get
            {
                return false;
            }
        }
    }
}
10. Add a Generic Handler “Save.ashx”. In the same way, connect the required namespaces; note that the content type should be ‘xml’ in this case.
using System;
using System.Collections.Generic;
using System.Linq;
using System.Web;
using DHTMLX.Common;

namespace mySchedulerNET
{
    public class Save : IHttpHandler
    {

        public void ProcessRequest(HttpContext context)
        {
            context.Response.ContentType = "text/xml";

            var action = new DataAction(context.Request.Form);

            var data = new SampleDataContext();
In this application we use a helper ‘DHXEventsHelper’ to assembly the event object and update it in LINQ to SQL. Two methods - ‘Bind’ and ‘Update’ - are used for this purpose:
try
{

    var changedEvent = (Event)DHXEventsHelper.Bind(typeof(Event), context.Request.Form);//create event object from request

    switch (action.Type)
    {
        case DataActionTypes.Insert: // define here your Insert logic
            data.Events.InsertOnSubmit(changedEvent);
            break;
        case DataActionTypes.Delete: // define here your Delete logic
            changedEvent = data.Events.SingleOrDefault(ev => ev.id == action.SourceId);
            data.Events.DeleteOnSubmit(changedEvent);
            break;
        default:// "update" // define here your Update logic
            var updated = data.Events.SingleOrDefault(ev => ev.id == action.SourceId);
            //update "updated" object by changedEvent's values, 'id' should remain unchanged

            DHXEventsHelper.Update(updated, changedEvent, new List<string>() { "id" });
            break;
    }
Add ‘SumbitChanges’ value to submit data to the database and retrieve Event Id after the action is performed:
data.SubmitChanges();
action.TargetId = changedEvent.id;
Add ‘Error’ action type to mark action as failed in case of exception and render the response.
        catch (Exception a)
        {
            action.Type = DataActionTypes.Error;
        }
        context.Response.Write(new AjaxSaveResponse(action).ToString());
    }

    public bool IsReusable
    {
        get
        {
            return false;
        }
    }
}
Here is the full code:
using System;
using System.Collections.Generic;
using System.Linq;
using System.Web;
using DHTMLX.Common;

namespace mySchedulerNET
{
    public class Save : IHttpHandler
    {
        public void ProcessRequest(HttpContext context)
        {
            context.Response.ContentType = "text/xml";
            var action = new DataAction(context.Request.Form);

            var data = new SampleDataContext();

            try
            {

                var changedEvent = (Event)DHXEventsHelper.Bind(typeof(Event), context.Request.Form);//create event object from request

                switch (action.Type)
                {
                    case DataActionTypes.Insert: // define here your Insert logic

                        data.Events.InsertOnSubmit(changedEvent);
                        break;

                    case DataActionTypes.Delete: // define here your Delete logic
                        changedEvent = data.Events.SingleOrDefault(ev => ev.id == action.SourceId);
                        data.Events.DeleteOnSubmit(changedEvent);
                        break;

                    default:// "update" // define here your Update logic
                        var updated = data.Events.SingleOrDefault(ev => ev.id == action.SourceId);
                        //update "updated" object by changedEvent's values, 'id' should remain unchanged
                        DHXEventsHelper.Update(updated, changedEvent, new List<string>() { "id" });
                        break;
                }
                data.SubmitChanges();
                action.TargetId = changedEvent.id;
            }
            catch (Exception a)
            {
                action.Type = DataActionTypes.Error;
            }
            context.Response.Write(new AjaxSaveResponse(action).ToString());
        }
        public bool IsReusable
        {
            get
            {
                return false;
            }
        }
    }
}
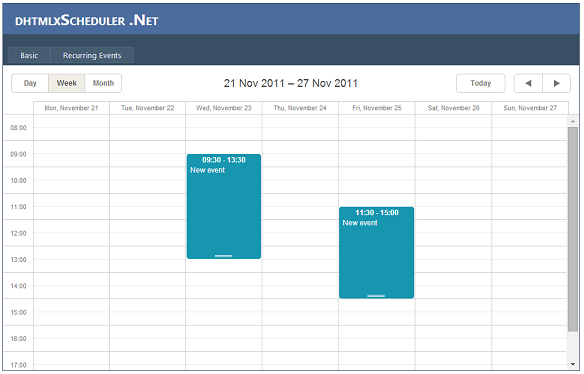
By following the above steps you'll get a basic .NET event calendar like this one:
Get Scheduler .NET right now.

The default skin is 'terrace' starting from Scheduler .NET v.3.0
If you find this post useful, please share your opinion below and recommend it to your friends.