In this article we’ll show you how to easily set up DHTMLX Scheduler .NET with a special server-side library called dhtmlxConnector. It considerably speeds up and simplifies the creation of an event calendar in ASP.NET.
In the end, you’ll get a nice flat-skin event calendar with a customizable lightbox like on the screenshot below:
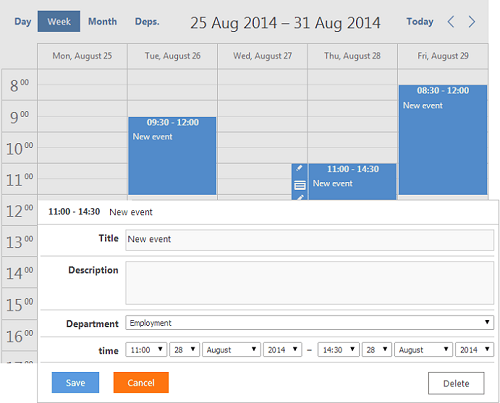
Proceed reading the tutorial or check the ready sample right now.
The Initial Steps of Creation. Libraries and Database Setup
The initial steps to create an event calendar remain the same:
1. Create a new ASP.NET Web Application and name it “CalendarConnector”;
2. Let's add HtmlAgilityPack.dll and DHTMLX Scheduler .NET via NuGet. Right click on your project and select 'Manage Nuget Packages', do search and install the mentioned libraries. Then download dhtmlxConnector and connect it to the project.
3. Set up the database by creating a new SQL Server Database (e.g. MyCalendar.mdf) that will contain data about events.
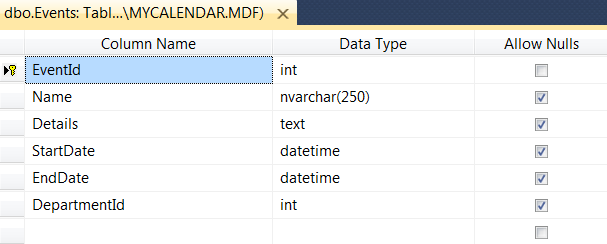
At this step we will add a table “Events” and one more table “Departments”. The latter will enable further selection of the required departments in the lightbox and their storage in the database.
Set the “Events” table columns as follows:
Add two columns to the table “Departments” as it is shown below:
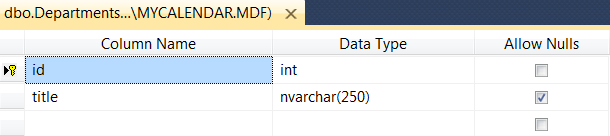
Note: set primary key to id; set identity column to EventsId for the table “Events” and to id for the table “Departments”
Scheduler Initialization and Customization
As you can remember from the previous tutorials, we used to create a LINQ to SQL Classes Model to load data from the database table. Then we had to implement the scheduler logic for data loading and saving.
With dhmtlxConnectors the above mentioned steps can be skipped. If simple queries are used as data source, dhtmlxConnector will automatically generate sql queries for adding, modifying and deleting events. For more complex queries (e.g. join of several tables), sql queries are added manually.
First, make amendments to the Scheduler .NET configuration in Default.aspx.cs:
1. Add a property to render scheduler object to the page. Then initialize and customize the scheduler inside the Page_Load event.
public DHXScheduler Scheduler { get; set; }
        protected void Page_Load(object sender, EventArgs e)
        {
            this.Scheduler = new DHXScheduler();
2. Define date format in data xml:
Scheduler.Config.xml_date = "%Y-%m-%d %H:%i";
Note that the connector described below returns dates in the format different from the default Scheduler date format. That's why we have to change it.
3. Enable the connector itself:
Scheduler.ConnectorMode = true;
4. Define data format to use XML (Scheduler .NET uses json data format by default):
Scheduler.DataFormat = SchedulerDataLoader.DataFormats.XML;
5. Enable dynamic loading of data:
Scheduler.EnableDynamicLoading(SchedulerDataLoader.DynamicalLoadingMode.Month);
6. Add Units view and select:
We have created a simple event calendar. Let’s add resource view to sort the events by date or resource. As far as we have departments in our sample, let’s add Units view and select to the lightbox.
Scheduler.Views.Add(new UnitsView("units", "DepartmentId") { ServerList = "departments", Label = "Deps." });
7. Update the Scheduler skin to 'flat' (it is 'terrace' by default):
Scheduler.Skin = DHXScheduler.Skins.Standart;
Here is the coding we have at the moment:
using System.Linq;
using System.Web;
using System.Web.UI;
using System.Web.UI.WebControls;
using DHTMLX.Scheduler;
using DHTMLX.Scheduler.Controls;
using DHTMLX.Scheduler.Data;
namespace CalendarConnector
{
    public partial class _Default : System.Web.UI.Page
    {
        public DHXScheduler Scheduler { get; set; }
        protected void Page_Load(object sender, EventArgs e)
        {
            this.Scheduler = new DHXScheduler();

            Scheduler.Config.first_hour = 8;
            Scheduler.Config.last_hour = 19;
            Scheduler.Config.time_step = 30;
            Scheduler.Config.limit_time_select = true;
            Scheduler.Skin = DHXScheduler.Skins.Flat;
            Scheduler.EnableDynamicLoading(SchedulerDataLoader.DynamicalLoadingMode.Month);

            Scheduler.Config.xml_date = "%Y-%m-%d %H:%i";
            Scheduler.ConnectorMode = true;
            Scheduler.DataFormat = SchedulerDataLoader.DataFormats.XML;
            Scheduler.LoadData = true;
            Scheduler.Data.Loader.PreventCache();
            Scheduler.EnableDataprocessor = true;
        }
    }
}
In the recent updates of Scheduler .NET dhtmlxmessage library is used to enable a pop up box with an OK and Cancel choice. However, it is not integrated into the skin builder yet. That's why we have to add the required css styles manually. Go to Default.aspx and update the following coding:
<%@ Page Title="Home Page" Language="C#" MasterPageFile="~/Site.master" AutoEventWireup="true"
    CodeBehind="Default.aspx.cs" Inherits="CalendarConnector._Default" %>

<asp:Content ID="HeaderContent" runat="server" ContentPlaceHolderID="HeadContent">
</asp:Content>
<asp:Content ID="BodyContent" runat="server" ContentPlaceHolderID="MainContent">
    <style>
    .main
    {
        margin:0;
        padding:0;
    }
    </style>
    <link rel="stylesheet" href="<%= this.ResolveUrl("~/Scripts/dhtmlxScheduler/dhtmlxmessage.css")%>" type="text/css" title="no title" charset="utf-8"/>
    <div style="height:510px">
        <%= this.Scheduler.Render() %>
    </div>
</asp:Content>
dhmtlxConnector in Use
Now it's time to attach a connector - a helper server-side library that enables access to the Scheduler databases.
Right-click on your project name in the Solution Explorer to add a connector. Select Generic Hander from the list and it Connector.ashx.
Create a connector that inherits dhtmlxRequestHander:
public class Connector : dhtmlxRequestHandler
Override CreateConnector method. Here you should create individual component-related dhtmlxSchedulerConnector that will interpret client requests:
public override IdhtmlxConnector CreateConnector(HttpContext context ){
We have to initialize the created connector. It can be implemented in the following way:
public override IdhtmlxConnector CreateConnector(HttpContext context)

{
    var connector = new dhtmlxSchedulerConnector(
        "Events"
        "EventId",
        dhtmlxDatabaseAdapterType.SqlServer2005,
        ConfigurationManager.ConnectionStrings["MyCalendar"].ConnectionString,
        "StartDate", "EndDate",
       "Name as text,Details,DepartmentId");

    return connector;
}
This method allows pulling all necessary data from the table (table name, columns and etc.).
Instead of passing the name of the table and its columns, as it is shown above, we can also pass SQL queries. Connector supports multitable queries and stored procedures.
The assigned parameters should contain the following data:
- datasource (table name or SQL queries);
- name of indicative column;
- database adapter type (MS SqlServer, Oracle, ODBC);
- connection string;
- start date column;
- end date column;
- other data columns.
Add options to enable selects in the lightbox and sections for Units view (Departments). First, add special dhtmlxOptionsConnector as it is shown below:
var optionsConnector = new dhtmlxOptionsConnector("Departments", "id", connector.Request.Adapter, "title");
The following parameters are passed to the connector designer:
- table name;
- name of indicative column;
- database adapter from parent connector;
- name of label column
Add optionsConnector:
connector.AddOptionsConnector("departments", optionsConnector);
Assign the name "departments" to this collection. It coincides with the name given to the ServerList Units view and lightbox select. When it is loaded, it can be accessed on the client-side through ‘scheduler.serverList("departments")’.
The full code should look as follows:
using System;
using System.Collections.Generic;
using System.Linq;
using System.Web;
using dhtmlxConnectors;
using System.Configuration;
namespace CalendarConnector
{
	/// <summary>
	/// Summary description for Connector
	/// </summary>
    public class Connector : dhtmlxRequestHandler
	{

    	public override IdhtmlxConnector CreateConnector(HttpContext context ){
        	var connector = new dhtmlxSchedulerConnector(
        	"Events"
        	, "EventId"
        	, dhtmlxDatabaseAdapterType.SqlServer2005
        	, ConfigurationManager.ConnectionStrings["MyCalendar"].ConnectionString,
        	"StartDate", "EndDate",
        	"Name as text,Details,DepartmentId");

            var optionsConnector = new dhtmlxOptionsConnector("Departments", "id", connector.Request.Adapter, "title");
            connector.AddOptionsConnector("departments", optionsConnector);

            return connector;
    	}


	}
}
Go back to Default.aspx.cs to enable data saving through Connector:
Scheduler.DataAction = Scheduler.SaveAction = ResolveUrl("~/Connector.ashx");
To render departments to the view, we assign "departments" to the ServerList that is used to refer to the departments collection loaded by the connector:
Scheduler.Views.Add(new UnitsView("units", "DepartmentId") {
                ServerList = "departments",
                Label = "Deps." }
                );
Then update sections in the lightbox. ServerList property is also set for the select (departments):
Scheduler.Lightbox.Add(new LightboxText("text", "Title") { Height = 30 });
Scheduler.Lightbox.Add(new LightboxText("Description", "Description") { Height = 60 });
Scheduler.Lightbox.Add(new LightboxSelect("DepartmentId", "Department") { ServerList = "departments" });
Scheduler.Lightbox.Add(new LightboxTime("time"));
Here is the full coding:
using System;
using System.Collections.Generic;
using System.Linq;
using System.Web;
using System.Web.UI;
using System.Web.UI.WebControls;
using DHTMLX.Scheduler;
using DHTMLX.Scheduler.Controls;
using DHTMLX.Scheduler.Data;
namespace CalendarConnector
{
    public partial class _Default : System.Web.UI.Page
    {
        public DHXScheduler Scheduler { get; set; }
        protected void Page_Load(object sender, EventArgs e)
        {
            this.Scheduler = new DHXScheduler();

            Scheduler.Config.first_hour = 8;
            Scheduler.Config.last_hour = 19;
            Scheduler.Config.time_step = 30;
            Scheduler.Config.limit_time_select = true;
            Scheduler.Skin = DHXScheduler.Skins.Flat;
            Scheduler.EnableDynamicLoading(SchedulerDataLoader.DynamicalLoadingMode.Month);

            Scheduler.Views.Add(new UnitsView("units", "DepartmentId")
            {
                ServerList = "departments",
                Label = "Deps."
            });

            Scheduler.Lightbox.Add(new LightboxText("text", "Title") { Height = 30 });
            Scheduler.Lightbox.Add(new LightboxText("Description", "Description") { Height = 60 });
            Scheduler.Lightbox.Add(new LightboxSelect("DepartmentId", "Department") { ServerList = "departments" });
            Scheduler.Lightbox.Add(new LightboxTime("time"));

            Scheduler.Config.xml_date = "%Y-%m-%d %H:%i";
            Scheduler.ConnectorMode = true;
            Scheduler.DataFormat = SchedulerDataLoader.DataFormats.XML;

            Scheduler.DataAction = Scheduler.SaveAction = ResolveUrl("~/Connector.ashx");
            Scheduler.LoadData = true;
            Scheduler.Data.Loader.PreventCache();
            Scheduler.EnableDataprocessor = true;
        }
    }
}
Scheduler Rendering
Finally, render the Scheduler in Default.aspx to have it show up on the web page:
<%@ Page Title="Home Page" Language="C#" MasterPageFile="~/Site.master" AutoEventWireup="true"
    CodeBehind="Default.aspx.cs" Inherits="CalendarConnector._Default" %>

<asp:Content ID="HeaderContent" runat="server" ContentPlaceHolderID="HeadContent">
</asp:Content>
<asp:Content ID="BodyContent" runat="server" ContentPlaceHolderID="MainContent">
   <%= Scheduler.Render() %>
</asp:Content>
Here is an event calendar you get:
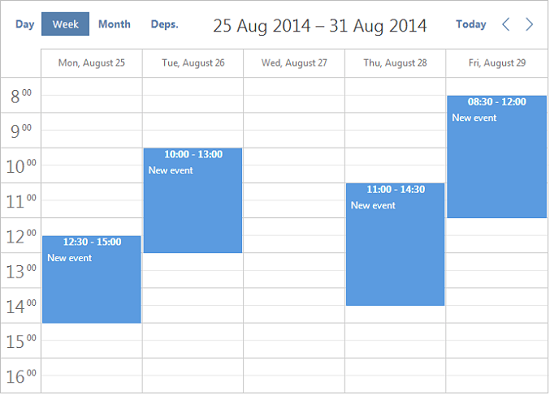
The ready sample with dhtmlxConnector is ready for download. Try it now!
If this article was helpful to you, share it with your friends and leave your opinion below.