In this article we will show you the easiest way to bind VB.NET calendar created with DHTMLX Scheduler with the Database in an application using Web Forms.
We'll also show how the options for the Resource View and the details form Select can be loaded from the server. The component page can be found here.
The demo will use a free and open source dhtmlxConnector library that takes on CRUD operations without a need to write CRUD methods manually.
You can download a ready sample with dhtmlxConnector right now or proceed with the tutorial:
Prerequisites
1. Create a project
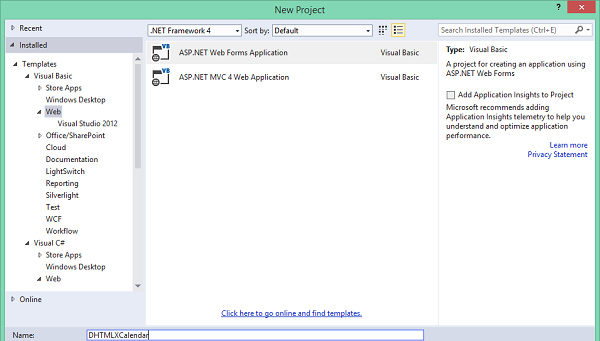
At first you need to create a new project. This example contains instructions for Visual Studio 2013 ASP.NET and VB.NET Web Forms Application:
- File - New Project
- In the left bar select Visual Basic - Web. Then select ASP.NET Web Forms Application and name it DHTMLXCalendar.
2. Install components
1. Install DHTMLX Scheduler event calendar from NuGet via Console Package manager:
PM> Install-Package DHTMLX.Scheduler.NET
2. You also can download it via Manage Packages.
3. Download dhtmlxConnector and add the librarydhtmlxConnector.NET.dll from the codebase/folder to the created project.
3. Create a database
In this section we will create a new database that contains two tables named ‘Events’ and ‘Departments’.
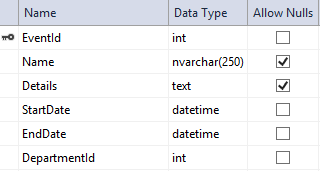
The ‘Events’ table will include the events of DHTMLX Scheduler .NET calendar. This table has the following fields:
EventId - (int, primary key, identity) - the id of an event
Name - (nvarchar(250), allow null) - the description of an event
Details - (text, allow null) - additional information of created event
StartDate - (datetime, not null) - the time an event starts
EndDate - (datetime, not null) - the time an event ends
DepartmentId - (int, foreign key) - id of department
The ‘Departments’ table should contain the names of departments and have the following fields:
id - (int, primry key, identiry) - id of a department
title - (nvarchar(250), allow null) - name of a department
SQL query for the ‘Departments’ table:
CREATE TABLE [dbo].[Departments] (
[id] INT IDENTITY (1, 1) NOT NULL,
[title] NVARCHAR (250) NULL
);
And add test data for this table:
SET IDENTITY_INSERT [dbo].[Departments] ON
INSERT INTO [dbo].[Departments] ([id], [title]) VALUES (1, N'department1')
INSERT INTO [dbo].[Departments] ([id], [title]) VALUES (2, N'department2')
INSERT INTO [dbo].[Departments] ([id], [title]) VALUES (3, N'department3')
INSERT INTO [dbo].[Departments] ([id], [title]) VALUES (4, N'department4')
INSERT INTO [dbo].[Departments] ([id], [title]) VALUES (5, N'department5')
INSERT INTO [dbo].[Departments] ([id], [title]) VALUES (6, N'department6')
SET IDENTITY_INSERT [dbo].[Departments] OFF
Note. EventId of the 'Events' and Id of the 'Department' tables should be identical. Otherwise you cannot create new events.
Now add a database connection string to Web.config file :
<configuration>
<connectionStrings>
<add name="DefaultConnection" providerName="System.Data.SqlClient" connectionString="YOUR_CONNECTION_STRING" />
</connectionStrings>
</configuration>
Integration of Scheduler Calendar with DHTMLXConnector
In other tutorials you create Model Classes which represent a table and properties in the columns of this tables. Then you have to implement the CRUD logic. With DHTMLXConnector you can skip these steps because DHTMLXConnector undertakes the tasks. This component will automatically generate the required queries for selecting, updating, inserting or deleting data. All you have to do is to initialize the connector.
1. Scheduler Initialization and Customization
At first we need to add scheduler calendar on the page. Open Default.aspx.vb in your project
and add the following namespaces:
Imports DHTMLX.Scheduler.Data
Imports DHTMLX.Scheduler.Controls
Next, initialize the SchedulerCalendar:
Public Scheduler As DHXScheduler
Protected Sub Page_Load(ByVal sender As Object, ByVal e As EventArgs) Handles Me.Load
 	Scheduler = New DHXScheduler()
End Sub
Next, we need to customize it:
- define date format in data xml. This is a fixed format used by dhtmlConnector :
Scheduler.Config.xml_date = "%Y-%m-%d %H:%i"
Scheduler.Config.first_hour = 8 'set minimum value for the hour scale (Y-Axis)'
Scheduler.Config.last_hour = 19 'sets the maximum value of the hour scale (Y-Axis)'
Scheduler.Config.time_step = 30 'sets the minimum step (in minutes) for event’s time values'
Scheduler.Config.limit_time_select = True 'sets the max and min values of time selector in the lightbox to the values the ‘last_hour’ and ‘first_hour’ options'

'
Scheduler.EnableDataprocessor = True 'enables DataProcessor in order to enable implementation CRUD operations'
- select skin of the calendar:
Scheduler.Skin = DHXScheduler.Skins.Flat
- enable dynamic loading of data:
Scheduler.EnableDynamicLoading(SchedulerDataLoader.DynamicalLoadingMode.Month)
- enable the connector mode. We need to enable this option in order to make scheduler use the data protocol that is supported by dhtmlxConnector:
Scheduler.ConnectorMode = True
- define data format to use XML (DHTMLX Scheduler uses json data format as default, while Connector uses XML):
Scheduler.DataFormat = SchedulerDataLoader.DataFormats.XML
Here is the full code:
Public Scheduler As DHXScheduler

Protected Sub Page_Load(ByVal sender As Object, ByVal e As EventArgs) Handles Me.Load
        Scheduler = New DHXScheduler()
        Scheduler.Config.first_hour = 8
        Scheduler.Config.last_hour = 19
        Scheduler.Config.time_step = 30
        Scheduler.Config.limit_time_select = True
        Scheduler.Skin = DHXScheduler.Skins.Flat
        Scheduler.EnableDynamicLoading(SchedulerDataLoader.DynamicalLoadingMode.Month)

        Scheduler.Config.xml_date = "%Y-%m-%d %H:%i"
        Scheduler.ConnectorMode = True
        Scheduler.DataFormat = SchedulerDataLoader.DataFormats.XML

        Scheduler.Data.Loader.PreventCache()
        Scheduler.EnableDataprocessor = True
 End Sub
Open Default.aspx and add the following code to the Body content:
<div style="height: 509px; width: 100%;">
        <%= Me.Scheduler.Render()%>
    </div>
Other content from this page can be removed.
At this stage, you will have a simple DHTMLX Scheduler .NET calendar without data loading:

2. DHTMLXConnector in Use
At this step we’ll attach the connector to our project:
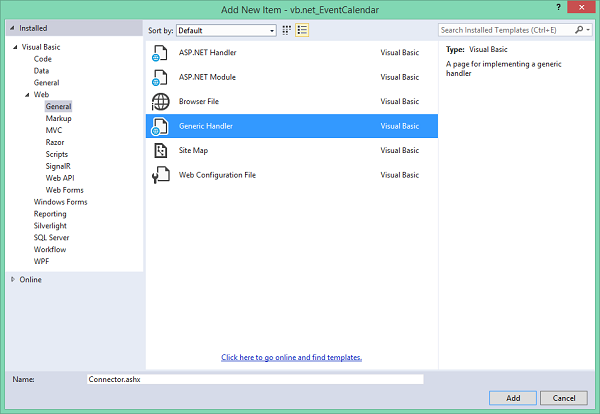
- Right-click on your project name in the Solution Explorer
- Select Add - New Item - Generic Handler
- Name it Connector.ashx
Add the following namespace to the created file:
Imports dhtmlxConnectors
Imports System.Configuration
Create a connector that inherits dhtmlxRequestHander:
Public Class Connector Inherits dhtmlxRequestHandler
Override the CreateConnector method. Here you should create an individual component-related dhtmlxSchedulerConnector that will interpret client requests:
Public Overrides Function CreateConnector(ByVal context As HttpContext) As IdhtmlxConnector

End Function
Next, you need to initialize the created connector. It can be implemented in the following way:
  Dim con = New dhtmlxSchedulerConnector(
                         "Events",
                         "EventId",
                         dhtmlxDatabaseAdapterType.SqlServer2005,
                         ConfigurationManager.ConnectionStrings("DefaultConnection").ConnectionString,
                         "StartDate", "EndDate",
                         "Name as text,Details,DepartmentId"
                         )
        Return con
Where
"Events" is the table name
"EventId" is the name of the identiry field
dhtmlxDatabaseAdapterType.SqlServer2005 - database adapter type or adapter. Connector can be used for various database engines like Oracle, MySQL, Postgres and etc. This option specifies MSSQL server and work for all versions of SQL server.
Also, we should load the list of departments into the connector. We'll need it later :
'Add options to enable selects in the lightbox and sections for Units view
        Dim optionsConnector = New dhtmlxOptionsConnector("Departments", "id",
                                                           connector.Request.Adapter, "title")
        connector.AddOptionsConnector("departments", optionsConnector)
The full code looks as follows:
Imports System.Web

Imports dhtmlxConnectors
Imports System.Configuration

Public Class Connector
    Inherits dhtmlxRequestHandler

    Public Overrides Function CreateConnector(ByVal context As HttpContext) As IdhtmlxConnector
        Dim con = New dhtmlxSchedulerConnector(
                         "Events",
                         "EventId",
                         dhtmlxDatabaseAdapterType.SqlServer2005,
                         ConfigurationManager.ConnectionStrings("DefaultConnection").ConnectionString,
                         "StartDate", "EndDate",
                         "Name as text,Details,DepartmentId"
                         )
        'Add options to enable selects in the lightbox and sections for Units view
        Dim optionsConnector = New dhtmlxOptionsConnector("Departments", "id",
                                                           con.Request.Adapter, "title")
        con.AddOptionsConnector("departments", optionsConnector)

        Return con
    End Function

End Class
To load data to the calendar it is necessary to open Default.aspx.vb again and add the following code:
'Set loading of data'
Scheduler.DataAction = ResolveUrl("~/Connector.ashx")
Scheduler.SaveAction = ResolveUrl("~/Connector.ashx")
Scheduler.LoadData = True
We've specified that the scheduler should load data from the connector and send updates from the client there as well .
We'll use a Units view to display events grouped by Departments. The list of departments will be loaded with events in a named collection. We'll need to specify the name of this collection in 'ServerList' property of UnitsView instance :
'Units'
Dim units = New UnitsView("units", "DepartmentId")
units.ServerList = "departments"
units.Label = "Deps."
Scheduler.Views.Add(units)
Now let’s update the configuration of the Lightbox. In addition to the default Text and Time inputs, we'll add a department selector and populate it with the same options as a UnitsView:
'Title'
Dim titl = New LightboxText("text", "Title")
titl.Height = 30
Scheduler.Lightbox.Add(titl)

'Description'
Dim descr = New LightboxText("Description", "Description")
descr.Height = 60
Scheduler.Lightbox.Add(descr)

'Department'
Dim deprtm = New LightboxSelect("DepartmentId", "Department")
deprtm.ServerList = "departments"
Scheduler.Lightbox.Add(deprtm)

'Time'
Scheduler.Lightbox.Add(New LightboxTime("time"))
Here is the full coding:
Imports DHTMLX.Scheduler
Imports DHTMLX.Scheduler.Controls
Imports DHTMLX.Scheduler.Data


Public Class [Default]
    Inherits Page
    Public Scheduler As DHXScheduler
    Protected Sub Page_Load(ByVal sender As Object, ByVal e As EventArgs) Handles Me.Load
        Scheduler = New DHXScheduler()
        Scheduler.Config.first_hour = 8             'set minimum value for the hour scale (Y-Axis)'
        Scheduler.Config.last_hour = 19             'sets the maximum value of the hour scale (Y-Axis)'
        Scheduler.Config.time_step = 30             'sets the minimum step (in minutes) for event’s time values'
        Scheduler.Config.limit_time_select = True   'sets the max and min values of time selector in the lightbox to the values the ‘last_hour’ and ‘first_hour’ options'

        Scheduler.Skin = DHXScheduler.Skins.Flat


        Scheduler.EnableDynamicLoading(SchedulerDataLoader.DynamicalLoadingMode.Month)

        Scheduler.Config.xml_date = "%Y-%m-%d %H:%i"
        Scheduler.ConnectorMode = True
        Scheduler.DataFormat = SchedulerDataLoader.DataFormats.XML

        Scheduler.Data.Loader.PreventCache()        'adds the current ticks value to url to prevent caching of the request'
        Scheduler.EnableDataprocessor = True        'enables DataProcessor in order to enable implementation CRUD operations'

        'Set loading of data'
        Scheduler.DataAction = ResolveUrl("~/Connector.ashx")
        Scheduler.SaveAction = ResolveUrl("~/Connector.ashx")
        Scheduler.LoadData = True

        'Units'
        Dim units = New UnitsView("units", "DepartmentId")
        units.ServerList = "departments"
        units.Label = "Deps."
        Scheduler.Views.Add(units)

        'Title'
        Dim titl = New LightboxText("text", "Title")
        titl.Height = 30
        Scheduler.Lightbox.Add(titl)

        'Description'
        Dim descr = New LightboxText("Description", "Description")
        descr.Height = 60
        Scheduler.Lightbox.Add(descr)

        'Department'
        Dim deprtm = New LightboxSelect("DepartmentId", "Department")
        deprtm.ServerList = "departments"
        Scheduler.Lightbox.Add(deprtm)

        'Time'
        Scheduler.Lightbox.Add(New LightboxTime("time"))
    End Sub
End Class
In the end, youll get the calendar like the one below:
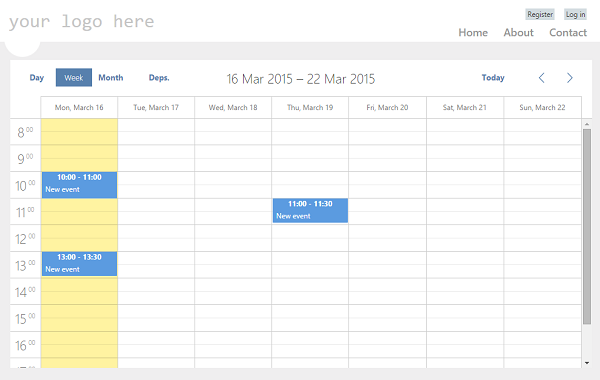
Download a sample with VB.NET Calendar in Web Forms right now: