According to multiple requests, we’ve made up a tutorial with ASP.NET Scheduler, explaining how you can manage visibility of reserved time spans for different users in one appointment calendar in ASP.NET.
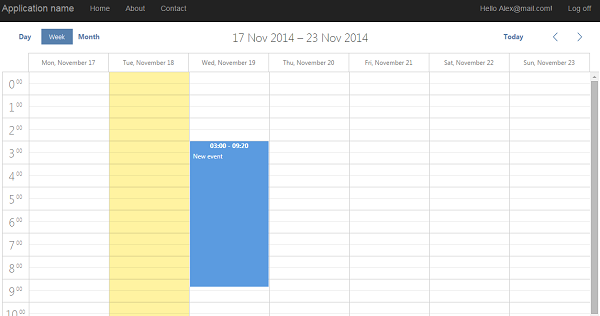
The idea is the following: if one user adds an event to the calendar, another user of this calendar is not able to see this event details, only a marked timespan, as it is demonstrated on the picture below:
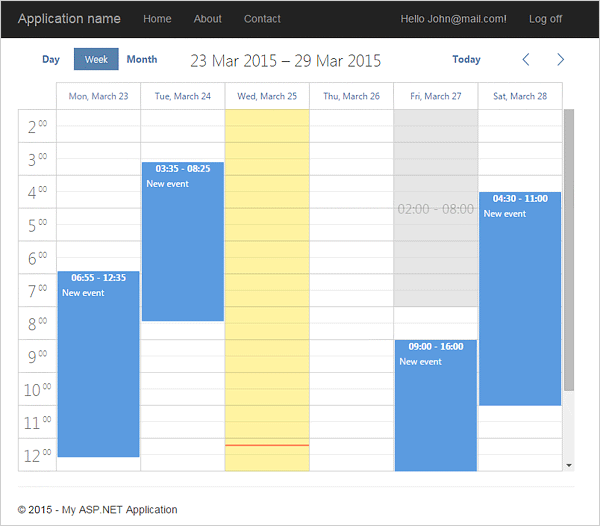
The tutorial is created in ASP.NET MVC5 Razor. You can download a ready ASP.NET calendar control example with blocked timespans right now, or follow the instructions described below:
We’ll create an MVC project in MS Visual Studio 2013, install DHTMLX Scheduler .NET and then add the requested marked timespans functionality.
1.Creating a New MVC Project
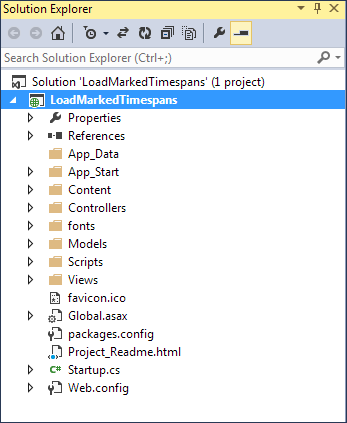
We’ll start from creation of a completely new project, naming it according to our topic - LoadMarkedTimespans. In the left panel of VS select Web and then ASP.NET Web Application. In the New ASP.NET Project window select MVC and make sure that authorization option is set as ‘Individual User Accounts’.
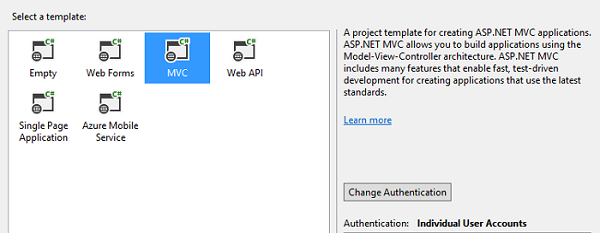
It’s going to be a project with ASP.NET Identity based authorization and a bunch of controllers and views to manage user actions.
2. Database Initialization
Afterwards, we need to initialize the database, create Admin role and several test users.
Let’s define a database initializer class.
Right click on the ‘Models’ and create a new class named ‘SchedulerDbInitializer’
using System;
using System.Collections.Generic;
using System.Linq;
using System.Web;

using System.Data.Entity;

namespace LoadMarkedTimespans.Models
{
    public class SchedulerDbInitializer : DropCreateDatabaseAlways<ApplicationDbContext>
    {
        protected override void Seed(ApplicationDbContext context)
        {

            base.Seed(context);
        }
    }
}
The class can be inherited either from DropCreateDatabaseIfModelChanges<T> or from DropCreateDatabaseAlways<T> classes. It will define when the database will be regenerated from the model classes (options are pretty self-explanatory)
We’ll add a role for site admin and a couple of test accounts. When you’ll be doing this, be sure to add ‘using’ for Microsoft.AspNet.Identity and Microsoft.AspNet.Identity.EntityFramework namespaces.
In our cases the code looks the following:
using System;
using System.Collections.Generic;
using System.Linq;
using System.Web;

using System.Data.Entity;
using Microsoft.AspNet.Identity;
using Microsoft.AspNet.Identity.EntityFramework;

namespace LoadMarkedTimespans.Models
{
    public class SchedulerDbInitializer : DropCreateDatabaseIfModelChanges<ApplicationDbContext>
    {
        protected override void Seed(ApplicationDbContext context)
        {
            var users = new UserManager<ApplicationUser>(new
                    UserStore<ApplicationUser>(context));

            var roles = new RoleManager<IdentityRole>(new
                                    RoleStore<IdentityRole>(context));

            string name = "Admin@mail.com";
            string password = "123456";


            // Create Admin role
            var adminRole = "Admin";
            if (!roles.RoleExists(adminRole))
            {
                var roleresult = roles.Create(new IdentityRole(adminRole));
            }

            // Create account for the admin
            var user = new ApplicationUser
            {
                UserName = name,
                Email = name
            };

            var adminresult = users.Create(user, password);

            // Assign new user to admin role
            if (adminresult.Succeeded)
            {
                var result = users.AddToRole(user.Id, adminRole);
            }

            // Create several test users
            var test_users = new string[]{
                "Alex@mail.com",
                "John@mail.com",
                "Sarah@mail.com",
                "Paul@mail.com"
            };

            foreach (var username in test_users)
            {
                users.Create(new ApplicationUser {
                    UserName = username,
                    Email = username
                }, "123456");
            }

            base.Seed(context);
        }
    }
}
Note that we use ApplicationDbContext class in the definition. This is the name of a default database context class created by Visual Studio.
The next step is to register our database initializer in the application. Open Global.asax.cs and add the following code to Application_Start method:
Database.SetInitializer<ApplicationDbContext>(new SchedulerDbInitializer());
Be sure to include System.Data.Entity and LoadMarkedTimespans.Models namespaces
Compete file:
using System;
using System.Collections.Generic;
using System.Linq;
using System.Web;
using System.Web.Mvc;
using System.Web.Optimization;
using System.Web.Routing;

using System.Data.Entity;
using LoadMarkedTimespans.Models;


namespace LoadMarkedTimespans
{
    public class MvcApplication : System.Web.HttpApplication
    {
        protected void Application_Start()
        {
            AreaRegistration.RegisterAllAreas();
            FilterConfig.RegisterGlobalFilters(GlobalFilters.Filters);
            RouteConfig.RegisterRoutes(RouteTable.Routes);
            BundleConfig.RegisterBundles(BundleTable.Bundles);
            Database.SetInitializer<ApplicationDbContext>(new SchedulerDbInitializer());
        }
    }
}
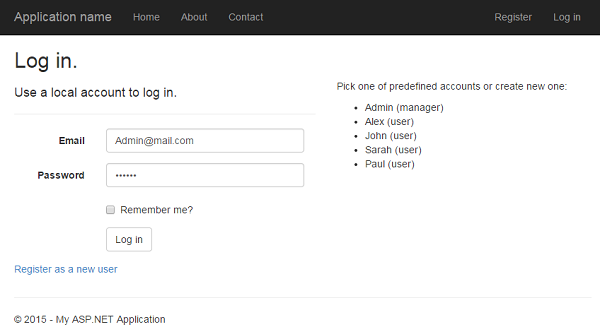
At this stage, if everything has been done correctly, you should be able to run application and log in using any of specified credentials.
3. Installing Scheduler .NET
The next step is to install Scheduler .NET and set different rules for users and Admin. Regular users will see only their events, Admin will see and will be able to modify events created by any user.
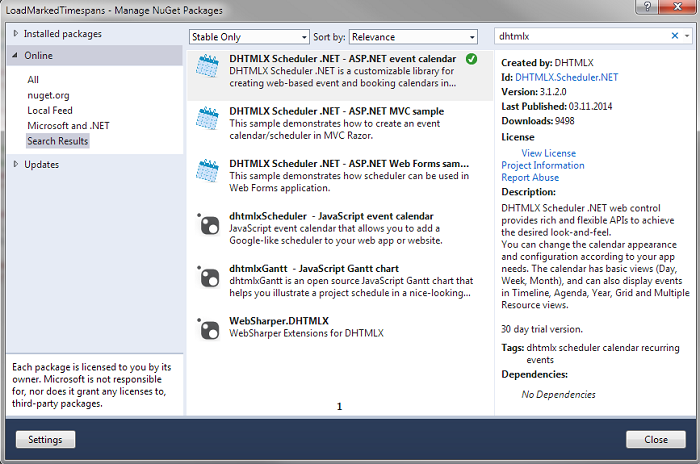
Firstly, let’s install DHTMLX Scheduler .NET from NuGet via Manage NuGet Package or Package Manager Console and add it to the index page:
3.1 Admin part
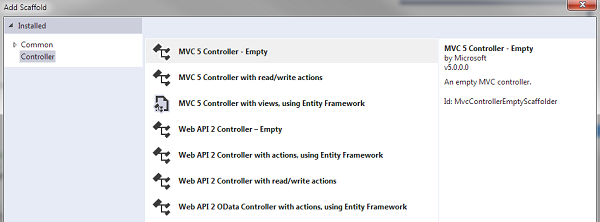
Select ‘Controllers’ folder and add a new Empty Controller. Name it ‘SchedulerAdminController’.
Note: we’ll put regular and admin calendars in separate controllers.
Firstly, let's add a simple scheduler on the page, in order to see how it works:
using System;
using System.Collections.Generic;
using System.Linq;
using System.Web;
using System.Web.Mvc;

using DHTMLX.Scheduler;


namespace LoadMarkedTimespans.Controllers
{
    public class SchedulerAdminController : Controller
    {
        // GET: Scheduler
        public ActionResult Index()
        {
            var scheduler = new DHXScheduler(this);
            scheduler.Extensions.Add(SchedulerExtensions.Extension.ActiveLinks);
            scheduler.Skin = DHXScheduler.Skins.Flat;

            return View(scheduler);
        }
    }
}
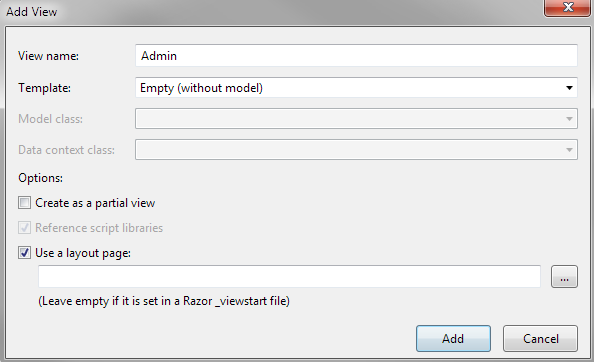
Create a new view Views->SchedulerAdmin->Index
It should have the following code:
@{
    ViewBag.Title = "Admin";
}

<div style="width:100%;height:800px">
    @Html.Raw(Model.Render())
</div>
And open the page. At this stage you probably see a couple of glitches in the calendar, wich are caused by over-general css rules of a project template:
3.2 Styles
Open Content/Site.css and find the following style:
/* Set width on the form input elements since they're 100% wide by default */
input,
select,
textarea {
    max-width: 280px;
}
In order not to break the pages generated by default, we won’t remove this style, but make it slightly more specific so that it won’t conflict with the scheduler:
/* Set width on the form input elements since they're 100% wide by default */
form input,
form select,
form textarea {
    max-width: 280px;
}
Another thing you might want to add is a border at the left side of the scheduler. By default, it is not shown, but can be added via css. Add the following styles to the css file:
.dhx_cal_data{
    border-left: 1px solid #CECECE;
}
.dhx_cal_header{
    border-left: 1px solid transparent !important;
}
You can also move css setting for the scheduler container div there:
.calendar-container{
    width:100%;
    height:800px;
}
Since we have two different pages with calendars, one for regular users and the other for managers, let’s create another view right away.
3.3 User part
Create an empty controller ‘Scheduler’ and go to ‘Views’-> ‘Schedule’. Create ‘Index.chtml’. Copy the code from Views->SchedulerAdmin->Index.cshtml and change the title to “User”. Repeat it for the controller action. We could put a duplicated code of both actions to a separate method, however for now there is not so much of it to bother.
Your code will look like the following:
Views - Scheduler - Index:

@{
    ViewBag.Title = "User";
}

@section scripts{
    <script src="~/Scripts/scheduler-client.js"></script>
    @Html.Raw(Model.GenerateLinks())
    <script>
        @Html.Raw(Model.GenerateJSCode())
    </script>
}

<div class="calendar-container">
    @Html.Raw(Model.GenerateMarkup())
</div>
Controllers - SchedulerController:
using System;
using System.Collections.Generic;
using System.Linq;
using System.Web;
using System.Web.Mvc;

using DHTMLX.Scheduler;


namespace LoadMarkedTimespans.Controllers
{
    public class SchedulerController : Controller
    {
        // GET: Scheduler
        public ActionResult Index()
        {
            var scheduler = new DHXScheduler(this);
            scheduler.Extensions.Add(SchedulerExtensions.Extension.ActiveLinks);
            scheduler.Skin = DHXScheduler.Skins.Flat;

            return View(scheduler);
        }
    }
}
3.4 Login rules
Next, let’s configure login rules. Unauthorized users should be redirected to the login page. After login, users and admins should go to their calendar pages.
Since we use the Home controller as a default entry point, we can add Authorize attributes there in order to manage access:
   public class HomeController : Controller
    {
        [Authorize]
        public ActionResult Index()
        {
            if (User.IsInRole("Admin"))
            {
                return RedirectToAction("Index", "SchedulerAdmin");
            }
            else
            {
                return RedirectToAction("Index", "Scheduler");
            }
        }
Then we need to add checks for authorization to calendar controllers.
Let’s restrict access of non-authorized users to both calendars. Additionally, it will require Admin role to access the admin calendar:
SchedulerController.cs:
namespace LoadMarkedTimespans.Controllers
{
    	[Authorize]
    	public class SchedulerController : Controller
    	{
public ActionResult Index()
{
       			 if (User.IsInRole("Admin"))
           			 this.RedirectToAction("Index", "SchedulerAdmin");

       			 ...
    		}
	}
}
SchedulerAdminController.cs:
namespace LoadMarkedTimespans.Controllers
{
    [Authorize(Roles = "Admin")]
    public class SchedulerAdminController : Controller
    {
        ….
    }
}
Now we have a template for an application - configured login with a couple of users and pages with a calendar.
3.5 Define a model
Now we’ll implement basic functionality of the schedulers in order to give users an ability to create bookings and admin to view them.
Define a model class for calendar event. Create a file SchedulerEvent.cs and define there a class with the following properties:
using System.ComponentModel.DataAnnotations;
using System.ComponentModel.DataAnnotations.Schema;

using DHTMLX.Scheduler;

namespace LoadMarkedTimespans.Models
{
    public class SchedulerEvent
    {
        [Key]
        [DatabaseGenerated(DatabaseGeneratedOption.Identity)]
        [DHXJson(Alias = "id")]
        public int ID { get; set; }

        [DHXJson(Alias = "text")]
        public string Text { get; set; }

        [DHXJson(Alias = "start_date")]
        public DateTime StartDate { get; set; }

        [DHXJson(Alias = "end_date")]
        public DateTime EndDate { get; set; }

        public string UserId { get; set; }
    }
}
We already have a database context class which was created with the Identity classes. We’ll attach our new model to this context. Firstly, we’ll move the context to a separate file. Copy ApplicationDbContext class form IdentityModels .cs, create a new file ApplicationDbContext.cs and paste the class there.
using System.Data.Entity;
using System.Security.Claims;
using System.Threading.Tasks;
using Microsoft.AspNet.Identity;
using Microsoft.AspNet.Identity.EntityFramework;

namespace LoadMarkedTimespans.Models
{
    public class ApplicationDbContext : IdentityDbContext<ApplicationUser>
    {
        public ApplicationDbContext()
            : base("DefaultConnection", throwIfV1Schema: false)
        {
        }

        public static ApplicationDbContext Create()
        {
            return new ApplicationDbContext();
        }

        public System.Data.Entity.DbSet<LoadMarkedTimespans.Models.SchedulerEvent> SchedulerEvents { get; set; }
    }
}
3.6 CRUD operations
When it’s done, we’ll implement a CRUD logic for our calendars. Let’s start with the regular user, open SchedulerController.cs. Firstly, add a couple of namespaces, which will be needed later:
using DHTMLX.Scheduler;
using DHTMLX.Scheduler.Data;
using DHTMLX.Common;
using System.Data.Entity;

using LoadMarkedTimespans.Models;
The basic loading and saving of calendar data is quite simple. The code is similar to that described in the previous tutorial, so we’ll just paste it without a big explanation.
Load data:
public ContentResult Data()
{
    var context = new ApplicationDbContext();

    var apps = context.SchedulerEvents.ToList();
    return new SchedulerAjaxData(apps);
}
Operations of changing data:
public ActionResult Save(int? id, FormCollection actionValues)
{
    var action = new DataAction(actionValues);
    var context = new ApplicationDbContext();
    try
    {
        var changedEvent = DHXEventsHelper.Bind<SchedulerEvent>(actionValues);
        switch (action.Type)
        {
            case DataActionTypes.Insert:
                context.SchedulerEvents.Add(changedEvent);
                break;
            case DataActionTypes.Delete:
                context.Entry(changedEvent).State = EntityState.Deleted;
                break;
            default:// "update"
                context.Entry(changedEvent).State = EntityState.Modified;
                break;
        }
        context.SaveChanges();
        action.TargetId = changedEvent.ID;
    }
    catch
    {
        action.Type = DataActionTypes.Error;
    }

    return (new AjaxSaveResponse(action));
}
And enable loading and saving data on the client-side:
public ActionResult Index()
{
    var scheduler = new DHXScheduler(this);
    scheduler.Extensions.Add(SchedulerExtensions.Extension.ActiveLinks);

    scheduler.Skin = DHXScheduler.Skins.Flat;
    scheduler.LoadData = true;
    scheduler.EnableDataprocessor = true;

    return View(scheduler);
}
With the default settings scheduler will use ‘Controller/Save’ and ‘Controller/Data’ routes, so the client-side operations will be binded to the actions we’ve just defined.
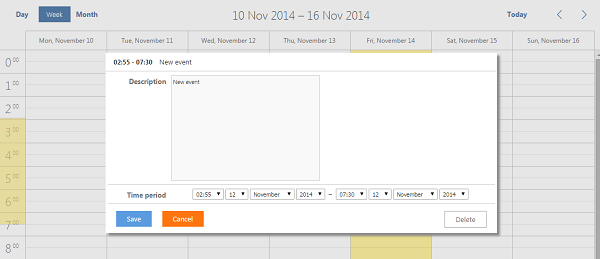
Let’s login as one of the users and checkout how the application works now:
So, we have a calendar that supports creating the events. All users can see and edit appointments of other users.
3.7 Hiding another user’s events
Let’s fix it. We’ll bind events to the users who have created them, and users will see only their events.
We’ll add simple checking for user id on selecting data, and will assign the current user id to the event that he has saved.
Add this namespace:
using Microsoft.AspNet.Identity;
Add following changes to the actions:
public ContentResult Data()
{
    var context = new ApplicationDbContext();
    var appUserId = User.Identity.GetUserId();

    var apps = context.SchedulerEvents.Where(e => e.UserId == appUserId).ToList();
    return new SchedulerAjaxData(apps);
}

public ActionResult Save(int? id, FormCollection actionValues)
{
    var action = new DataAction(actionValues);
    var context = new ApplicationDbContext();
    try
    {
        var changedEvent = DHXEventsHelper.Bind<SchedulerEvent>(actionValues);

        changedEvent.UserId = User.Identity.GetUserId();
       ….
    }
    catch
    {
        action.Type = DataActionTypes.Error;
    }

    return (new AjaxSaveResponse(action));
}
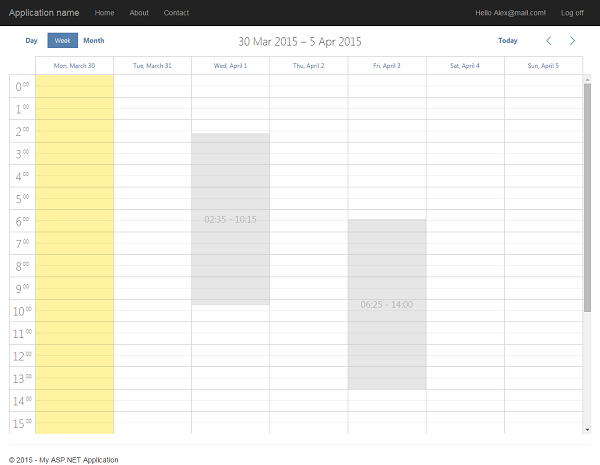
Now users have access only to their events.
3.8 Data format settings
As far as we load only the currently displayed events, the page will send the required date range to the server. In order to be sure that the dates will be parsed correctly regardless the server environment settings we’ll set the invariant culture for the application. Open web.config file and add this setting to <system.web> group.
<globalization culture="en-US" uiCulture="en-US" />
3.9 Blocking of time
The next step and mostly the goal of this tutorial - in user calendar we need to dynamically block the times that have been already booked by other clients and indicate it in the calendar.
Firstly, add the required scheduler extensions - one to highlight time areas in calendar and one to prevent creation of overlapping events. Open Index action of ‘SchedulerController’ and add the following two lines:
public class SchedulerController : Controller
{
        public ActionResult Index()
        {
            var scheduler = new DHXScheduler(this);
	scheduler.Extensions.Add(SchedulerExtensions.Extension.ActiveLinks);
            scheduler.Extensions.Add(SchedulerExtensions.Extension.Limit);
            scheduler.Extensions.Add(SchedulerExtensions.Extension.Collision);
        }
}
And enable dynamic loading mode of the scheduler. This will prevent scheduler from loading all appointments that are stored in database at once, and will load only those that should be currently displayed:
scheduler.EnableDynamicLoading(SchedulerDataLoader.DynamicalLoadingMode.Month);
Open ‘SchedulerController’ and update the Data action in order to load only requested timespans and load events of other users as blocked intervals:
public ContentResult Data(DateTime from, DateTime to)
{
    var context = new ApplicationDbContext();
    var appUserId = User.Identity.GetUserId();

    // load current user's events as appointments
    var apps = context.SchedulerEvents
        .Where(e => e.UserId == appUserId && e.StartDate < to && e.EndDate > from).ToList();

    // load others as blocked intervals
    var blocked = context.SchedulerEvents
        .Where(e => e.UserId != appUserId && e.StartDate < to && e.EndDate > from)
        .Select(e => new { e.StartDate, e.EndDate}).ToList();

    var response = new SchedulerAjaxData(apps);
    response.ServerList.Add("blocked_time", blocked);

    return response;
}
The next part should be done on the client via JS.
In the folder /Scripts create a JS file where we’ll put our custom code, name it scheduler-client.js
We’ll define a host object for that page and define there the methods we need. Here is a complete code, we’ll explain some parts of it below:
window.schedulerClient = {
    init: function () {
        scheduler.serverList("blocked_time");//initialize server list before scheduler initialization

        scheduler.attachEvent("onXLS", function () {
            scheduler.config.readonly = true;
        });

        scheduler.attachEvent("onXLE", function () {
            var blocked = scheduler.serverList("blocked_time");
            schedulerClient.updateTimespans(blocked);
            blocked.splice(0, blocked.length);

            //make scheduler editable again and redraw it to display loaded timespans
            scheduler.config.readonly = false;
            scheduler.setCurrentView();
        });
    },

    updateTimespans: function (timespans) {
        // preprocess loaded timespans and add them to the scheduler
        for (var i = 0; i < timespans.length; i++) {
            var span = timespans[i];

            span.start_date = scheduler.templates.xml_date(span.StartDate);
            span.end_date = scheduler.templates.xml_date(span.EndDate);

            // add a label
            span.html = scheduler.templates.event_date(span.start_date) +
                " - " +
                scheduler.templates.event_date(span.end_date);


           //define timespan as 'blocked'
            span.type = "dhx_time_block";
            scheduler.deleteMarkedTimespan(span);// prevent overlapping

            scheduler.addMarkedTimespan(span);
        }
    }
};
We’ve defined a global object that will hold all methods and variables, which we’ll define for this page. In ‘schedulerClient.init’ methods we’ll do all settings that has to be done on the client-side.
Each time the data is loaded, the response will contain a collection of blocked times that are provided as a named collection 'blocked_time'. We parse these items and add them to the scheduler as marked timespans.
When it’s done, we add a JS file to the page with the scheduler (Views - Scheduler - Index.cshtml)
@section scripts{
    <script src="~/Scripts/scheduler-client.js"></script>
    @Html.Raw(Model.GenerateLinks())
    <script>
        @Html.Raw(Model.GenerateJSCode())
    </script>
}

<div class="calendar-container">
    @Html.Raw(Model.GenerateMarkup())
</div>
Actually, we did something more here. We put code in a ‘scripts’ section, that will be rendered at the bottom of the page, in order to speed up the response time of the page. We’ll follow that approach and put all js/css related to dhtmlxScheduler there as well and configure server side to run our code right before the scheduler is initialized.
Controllers-SchedulerController.cs:
public class SchedulerController : Controller
{
        // GET: Scheduler
        [Authorize]
        public ActionResult Index()
        {
		….
// run the init
scheduler.BeforeInit.Add("schedulerClient.init()");
….
       }
}
Open /Content/Site.css and add the following style for the blocked times:
.dhx_time_block{
    text-align: center;
    font-size: large;
}
Let’s try it out!
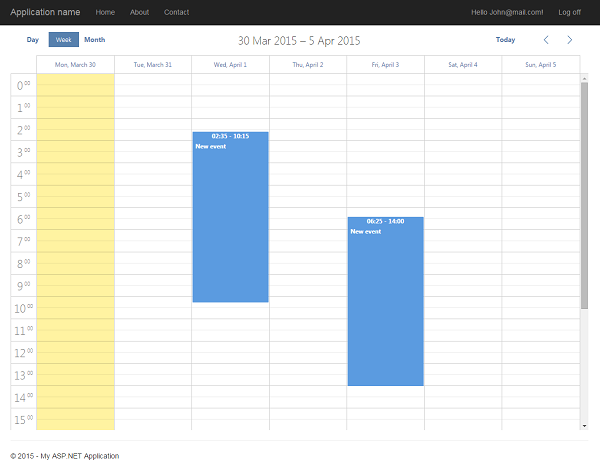
We’ve logged in as one of the users and created a couple of events:
Next, let logout and select another user from the list.
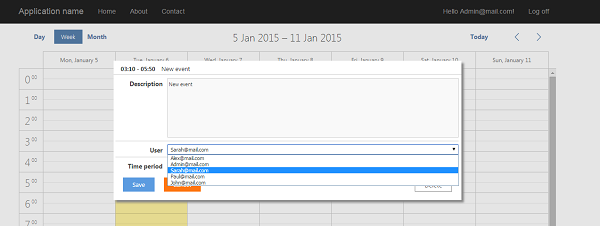
Now we'll make final adjustments to the Admin page. Admin should have full control over appointments, including reassigning them between users.
Let’s add user selection to the details form and display the related user name right next to the event description:
using DHTMLX.Scheduler.Controls;
using LoadMarkedTimespans.Models;

namespace LoadMarkedTimespans.Controllers
{
    [Authorize(Roles = "Admin")]
    public class SchedulerAdminController : Controller
    {
        // GET: SchedulerAdmin
        public ActionResult Index()
        {
            var scheduler = new DHXScheduler(this);

            ...

            scheduler.Lightbox.Add(new LightboxText("text", "Description"));

            var context = new ApplicationDbContext();
            var users = context.Users.Select(u => new { key = u.Id, label = u.Email }).ToList();

            var select = new LightboxSelect("UserId", "User");
            select.ServerList = "users";
            select.AddOptions(users);

            scheduler.Lightbox.Add(select);
            scheduler.Lightbox.Add(new LightboxTime("time", "Time period"));
            ...
        }
Note that we've specified the name of a users collection in this line:
select.ServerList = "users";
that will allow us to access this list of users on the client side.
Now redefine the labels of the appointments.The template will be redefined on the client side, so let’s add a js file the same way we did for the users’ calendar - create a file Scripts/scheduler-admin.js.
Again, we'll define a host object that will store all public methods we'll declare. This one will be simpler since we only need to redefine a template for event labels open /Scripts/scheduler-admin.js and add a template declaration:
window.schedulerAdmin = {
    init: function () {

        scheduler.templates.event_bar_text = scheduler.templates.event_text =
            function (start, end, ev) {
                var user = schedulerAdmin.findUser(ev.UserId);
                text = (user ? "<b>" + user.label + "</b> - " : "") + ev.text;

                return text;
            }

    },

    findUser: function (id) {
        var users = scheduler.serverList("users");
        for (var i = 0; i < users.length; i++) {
            if (users[i].key == id)
                return users[i];
        }
    }
};
When it’s done, we’ll add a JS file to the page with the scheduler (Views - SchedulerAdmin - Index.cshtml)
@{
    ViewBag.Title = "Admin";
}

@section scripts{
    <script src="~/Scripts/scheduler-admin.js"></script>
    @Html.Raw(Model.GenerateLinks())
    <script>
        @Html.Raw(Model.GenerateJSCode())
    </script>
}

<div class="calendar-container">
    @Html.Raw(Model.GenerateMarkup())
</div>
And finally, link the script to the scheduler - open Controllers/SchedulerAdminController.cs and add the following line to the Index action:
public class SchedulerAdminController : Controller
{
   public ActionResult Index()
   {
      var scheduler = new DHXScheduler(this);
      ...

      scheduler.BeforeInit.Add("schedulerAdmin.init();");

      return View(scheduler);

}
You are welcome to subscribe to our Scheduler .NET related news and download a ready asp.net calendar control example with loading blocked timespans:
If you find this tutorial helpful or you have any questions thereupon, you are welcome to share your opinion below.